Writing Modules
Please, read these rules carefully and try to follow them when writing a new module.
Function Naming
It is highly recommended to use pre-existing function names when writing a module for a device class that is already present in Atomize. Also do not forget to change the documentation accordingly, if there are any peculiarities in using of your function.
Function Clustering
If it is possible, the same function should be able to query and set the target value:
sr830 = sr.SR_830()

sr830.lock_in_time_constant('30 ms')                    # set to 30 ms
current_time_constant = sr830.lock_in_time_constant()   # query
In this example the same function lock_in_time_constant() sets and queries the time constant of the SR-830 lock-in amplifier.
Device Class
All functions should be combined into one class. The class must have the name of the module file:
# device module of the SR-860 lock-in amplifier
class SR_860:
    ...
    def method_1(self): ...
    def method_2(self): ...
Class init() Function
The class initialization function should connect computer to the device. A general example is given below, more examples can be found in the atomize/device_modules/ directory.
# Stanford Research Systems SR-860 module
import pyvisa
from pyvisa.constants import StopBits, Parity

def __init__(self):
    ...
    # instruments are not connected to the PC in test runs
    if self.test_flag != 'test':
        if self.config['interface'] == 'gpib':
            # Gpib driver may not be installed on the PC
            import Gpib
            self.device = Gpib.Gpib(
                self.config['board_address'],
                self.config['gpib_address'],
                timeout=self.config['timeout'])

        elif self.config['interface'] == 'rs232':
            self.status_flag = 1
            rm = pyvisa.ResourceManager()
            self.device = rm.open_resource(
                self.config['serial_address'],
                read_termination=self.config['read_termination'],
                write_termination=self.config['write_termination'],
                baud_rate=self.config['baudrate'],
                data_bits=self.config['databits'],
                parity=self.config['parity'],
                stop_bits=self.config['stopbits'])
            self.device.timeout = self.config['timeout']

        elif self.config['interface'] == 'ethernet':
            self.status_flag = 1
            rm = pyvisa.ResourceManager()
            self.device = rm.open_resource(self.config['ethernet_address'])
            self.device.timeout = self.config['timeout']
BaseDevice
Most SCPI-style modules share the same __init__ boilerplate: load the configuration file, read test_flag, open the GPIB / RS-232 / Ethernet transport, run a connection self-test, and define device_write() / device_query() / close_connection(). The BaseDevice class in atomize/device_modules/base_device.py provides all of this, so a new module can subclass it and supply only the device-specific parts:
# Lakeshore 335 temperature controller
import atomize.device_modules.base_device as base
import atomize.device_modules.config.config_utils as cutil
import atomize.general_modules.general_functions as general

class Lakeshore_335(base.BaseDevice):
    config_file = 'Lakeshore_335_config.ini'   # name of the *_config.ini file

    def __init__(self):
        # auxiliary dictionaries and limits
        self.heater_dict = {'50 W': 3, '5 W': 2, '0.5 W': 1, 'Off': 0}
        self.loop_list = [1, 2]
        self.temperature_max = 320
        self.temperature_min = 0.3

        # config loading, test_flag, and the connection are handled by BaseDevice
        super().__init__()

        self.loop_config = int(self.specific_parameters['loop'])

    def _init_test_values(self):
        # values returned by the module during a test run
        self.test_temperature = 200.
        self.test_set_point = 298.

    def tc_temperature(self, channel):
        if self.test_flag != 'test':
            return float(self.device_query('KRDG? ' + channel))
        elif self.test_flag == 'test':
            return self.test_temperature
The subclass provides:
config_file— the name of the configuration file (required);_init_test_values()— the canned values returned during a test run;- the device-specific functions (
tc_temperature(), …) that callself.device_write()/self.device_query().
BaseDevice provides:
- config loading (
self.config,self.specific_parameters) and theself.test_flagdispatch; _connect()— opens the transport forgpib/rs232/ethernetand runs_self_test()(a no-op by default, since not every device supports a self-test; override it to add one, e.g. a SCPI*CLS+*TST?check asLakeshore_335does);device_write(),device_query(), andclose_connection();gpib_query_wait— the GPIB write→read settle delay (default'50 ms', override per device).
Note
Subclassing BaseDevice is the recommended approach for new SCPI-style modules. Most existing modules still use the hand-written __init__ shown above, which remains fully supported.
ModbusDevice
Modbus (RS-485) instruments don't use the SCPI device_write() / device_query() string interface — they read and write numbered registers through minimalmodbus. They use a sibling base, ModbusDevice (atomize/device_modules/modbus_device.py), which provides the same config and test-mode plumbing over that register interface:
# Owen MK110 discrete I/O module (Modbus / RS-485)
import atomize.device_modules.modbus_device as base
import atomize.device_modules.config.config_utils as cutil

class Owen_MK110_220_4DN_4R(base.ModbusDevice):
    config_file = 'Owen_MK110_220_4DN_4R_config.ini'
    write_function_code = 16   # 16 = write multiple registers (use 6 for a single register)

    def __init__(self):
        self.channel_dict = {'1': 1, '2': 2, '3': 3, '4': 4}
        super().__init__()

    def _init_test_values(self):
        self.test_counter = 1

    def discrete_io_input_counter(self, channel):
        if self.test_flag != 'test':
            ch = self.channel_dict[channel]
            return int(self.device_read_unsigned(63 + ch, 0))
        elif self.test_flag == 'test':
            return self.test_counter
The subclass provides:
config_file— the name of the configuration file (required);write_function_code— the Modbus function code for register writes (6= single register,16= multiple; default16);_init_test_values()— the canned values returned during a test run;- the device-specific functions, built on the register read/write helpers.
ModbusDevice provides:
- config loading (
self.config,self.modbus_parameters,self.specific_parameters) and theself.test_flagdispatch; _connect()— opens theminimalmodbus.Instrumentfor thers485interface (mode, baud rate, byte size, parity, stop bits, timeout);device_read_unsigned()/device_read_signed()anddevice_write_unsigned()/device_write_signed()for register access;close_connection().
Note
A device that needs a settle delay after a signed read (e.g. Termodat_11M6) overrides device_read_signed() to add it; everything else is inherited.
Limits, Ranges, and Dictionaries
Specify ranges and limits for the device inside an __init__() function of the device class and use (if possible) dictionaries for matching device specific syntax and general high-level Atomize function arguments:
# auxiliary dictionaries
self.points_list    = [100, 250, 500, 1000, 2000, 5000, 10000, 20000,
                       50000, 100000, 200000, 500000]           # certain number of points
self.ref_slope_dict = {'Sine': 0, 'PosTTL': 1, 'NegTTL': 2}     # trigger modes
self.ac_type_dic    = {'Normal': 'NORM', 'Average': 'AVER',
                       'Hres': 'HRES', 'Peak': 'PEAK'}          # acquisition types

# limits (amplitude of the generated signal, V)
self.ref_ampl_min = 0.004
self.ref_ampl_max = 5
Configuration Files
Each device should have a configuration file. In this file the communication protocol settings and device specific parameters in the case of a module for a series of the devices should be specified. Examples can be found in atomize/device_modules/config/ directory with a local copy in DEVICE CONFIG DIRECTORY. Reading of a local copy of the configuration file should be done inside an __init__() function of the device class using special functions from the config_utils and local_config modules:
# Stanford Research Systems SR-860 module
import atomize.main.local_config as lconf
import atomize.device_modules.config.config_utils as cutil

def __init__(self):
    # path to the *.ini file
    self.path_current_directory = lconf.load_config_device()
    self.path_config_file = os.path.join(self.path_current_directory, 'SR_860_config.ini')

    # configuration data
    self.config = cutil.read_conf_util(self.path_config_file)
    self.specific_parameters = cutil.read_specific_parameters(self.path_config_file)

    # content of self.config (see the config file below):
    #   self.config['interface']       = 'ethernet'
    #   self.config['board_address']   = 0
    #   self.config['gpib_address']    = 12
    #   self.config['serial_address']  = 'ASRL/dev/ttyUSB0::INSTR'
    #   ...
The corresponding config.ini file is as follows:
; Stanford Research Systems SR-860 config.ini file
[DEFAULT]
name    = SR 860 Lock-in Amplifier
type    = ethernet
timeout = 1000

[GPIB]
board   = 0
address = 12

[SERIAL]
address           = ASRL/dev/ttyUSB0::INSTR
baudrate          = 9600
databits          = 8
startbits         = 1
stopbits          = one
parity            = none
read_termination  = r
write_termination = n
flow_control      = 0

[MODBUS]
mode          =
slave_address =

[ETHERNET]
address = TCPIP::192.168.2.20::INSTR

[SPECIFIC]
Device Specific Configuration Parameters
When you write a module for a series of the devices, it is convenient to specify some parameters in the configuration file. For example, the number of analog channels of an oscilloscope or a temperature controller loop. In this case, the module should work universally at any given values of specific device parameters.
SI Unit Suffix
Currently Atomize does not use the dimensions of physical units (current, frequency etc.), instead, special dictionaries are used:
self.timebase_dict = {'s': 1, 'ms': 1000, 'us': 1_000_000, 'ns': 1_000_000_000}
self.scale_dict    = {'V': 1, 'mV': 1000}
In order to take into account different scaling factors usually the value and scaling factor are treated independently:
# Rigol DP800 Series module

def __init__(self):
    ...
    # auxiliary dictionaries and limits
    self.current_dict     = {'A': 1, 'mA': 1000}
    self.channel_dict     = {'CH1': 1, 'CH2': 2, 'CH3': 3}
    self.current_min      = 0.
    self.channels         = int(self.specific_parameters['channels'])
    self.current_max_dict = {f'CH{i}': int(self.specific_parameters[f'ch{i}_current_max'])
                             for i in (1, 2, 3)}

def power_supply_current(self, *current):
    ...
    if len(current) == 2:
        # parse arguments
        ch = str(current[0])
        curr_str, scaling = current[1].split(" ")
        curr = float(curr_str)

        if ch in self.channel_dict:
            flag = self.channel_dict[ch]
            if flag <= self.channels:
                curr_max = self.current_max_dict[ch]
                # apply scale
                if scaling in self.current_dict:
                    coef = self.current_dict[scaling]
                    if self.current_min <= curr / coef <= self.current_max:
                        device_write(f':SOURce{flag}:CURRent{curr / coef}')
                        ...
Searching of a key can be done using a special function from the config_utils.py file:
# Stanford Research Systems SR-830 module
import atomize.device_modules.config.config_utils as cutil

def __init__(self):
    ...
    self.timeconstant_dict = {
        '10 us':  0, '30 us':  1, '100 us':  2, '300 us':  3,
        '1 ms':   4, '3 ms':   5, '10 ms':   6, '30 ms':   7,
        '100 ms': 8, '300 ms': 9, '1 s':    10, '3 s':    11,
        '10 s':  12, '30 s':  13, '100 s':  14, '300 s':  15,
        '1 ks':  16, '3 ks':  17, '10 ks':  18, '30 ks':  19,
    }

def lock_in_time_constant(self, *timeconstant):
    ...
    elif len(timeconstant) == 0:
        raw_answer = int(self.device_query("OFLT?"))
        # raw answer -> readable string
        return cutil.search_keys_dictionary(self.timeconstant_dict, raw_answer)
Pyqtgraph SI Unit Suffix
Another option is to use pyqtgraph helper functions. They can be used to convert numbers to strings with appropriate SI unit suffix:
# Keysight_2000_Xseries module
import pyqtgraph as pg

def oscilloscope_time_resolution(self):
    raw_answer = float(self.device_query(":TIMebase:RANGe?"))
    # raw number -> string with SI suffix
    answer = pg.siFormat(raw_answer, suffix='s', precision=9, allowUnicode=False)
    ...
Pyqtgraph helper functions are also very useful in situations when only a discrete set of values is possible for a parameter. Two special functions from the config_utils.py file can be used in this case. The first one is parse_pg() that parses an input with different suffix; the second one is search_and_limit_keys_dictionary() that can be used to find a closest available value for the parameter within the specified limits:
parse_pg(str_to_parse: int/float + 'SI unit suffix',
        helper_list: list_of_available_values) -> parsed_value, int_value, int: [0, 1]
This function parses an input string {str_to_parse}, i.e. '20 ms', to closest available value from the {helper_tc_list}. The outputs are (i) parsed_value: string with SI unit suffix, e.g. '10 ms'; (ii) int_value: integer from the parsed string, e.g. 10; (iii) integer: [0, 1], which can be used to create warning message about a change in value.
search_and_limit_keys_dictionary(dict_to_search: dictionary,
        search_value: int/float + 'SI unit suffix',
        min_value: float, max_value: float) -> dict_value, dict_key, int: [0, 1]
This function checks that the input value {search_value}, i.e. '10 ms', is within the specified limits {min_value, max_value} and finds appropriate value in the dictionary {dict_to_search} using the input value {search_value} as the key. The outputs are (i) dict_val: value found in the dictionary {dict_to_search}; (ii) val_key: key found for this value; (iii) integer: [0, 1], which can be used to create warning message about a change in value.
The typical example from the device module is as follows:
# Stanford Research Systems SR-810 module
import atomize.device_modules.config.config_utils as cutil

def __init__(self):
    ...
    self.timeconstant_dict = {
        '10 us':  0, '30 us':  1, '100 us':  2, '300 us':  3,
        '1 ms':   4, '3 ms':   5, '10 ms':   6, '30 ms':   7,
        '100 ms': 8, '300 ms': 9, '1 s':    10, '3 s':    11,
        '10 s':  12, '30 s':  13, '100 s':  14, '300 s':  15,
        '1 ks':  16, '3 ks':  17, '10 ks':  18, '30 ks':  19,
    }
    self.helper_tc_list = [1, 3, 10, 30, 100, 300, 1000]

def lock_in_time_constant(self, *timeconstant):
    ...
    if len(timeconstant) == 1:
        tc = timeconstant[0]

        # parse {tc} -> closest available value from {helper_tc_list}
        # parsed_value: str with SI suffix, e.g. '10 ms'
        # int_value:    integer from the parsed string, e.g. 10
        # a:            warning flag (0/1)
        parsed_value, int_value, a = cutil.parse_pg(tc, self.helper_tc_list)

        # check that parsed value is within {10e-6, 30e3} and look up dict
        # val:     value found in the dictionary
        # val_key: key for this value
        # b:       warning flag (0/1)
        val, val_key, b = cutil.search_and_limit_keys_dictionary(
            self.timeconstant_dict, parsed_value, 10e-6, 30e3)
        self.device_write(f"OFLT {val}")

        if a or b:
            general.message(f"TC cannot be set, the nearest available value of {val_key} is used")
Test Run
There is a test section in Atomize. During the test software checks that an experimental script has appropriate syntax and does not contain logical errors. It means that all the parameters during script execution do not go beyond the device limits. For instance, the test can detect that the field of the magnet is requested to be set to a value that the magnet cannot produce. During the test run the devices are not accessed, calls of the wait() function do not make the program sleep for the requested time, graphics are not drawn etc. To print a string in the main window in the test run, the function message_test() from the general_functions module can be used.
The execution flow of experimental scripts can be illustrated as follows:
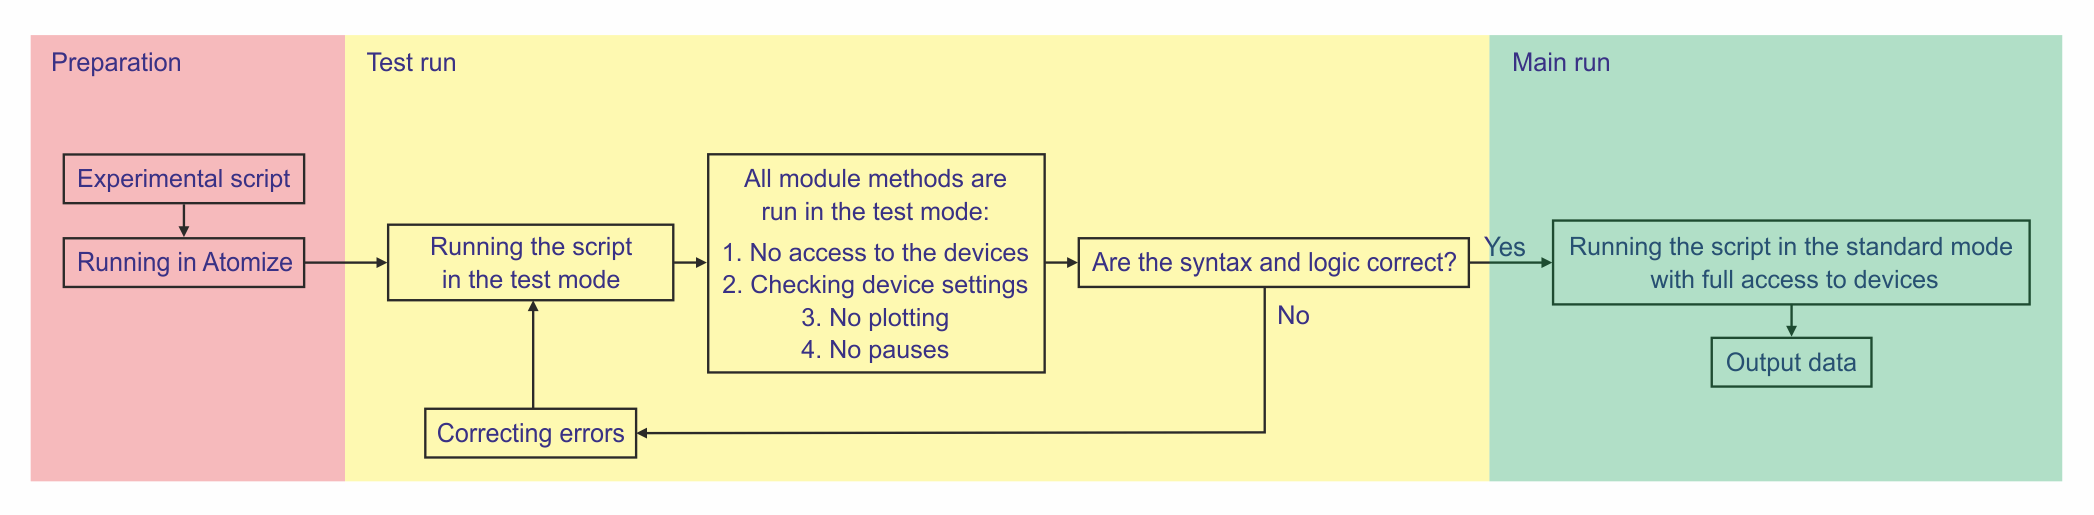
After an experimental script is written and launched in Atomize, a test run is performed, in which there is no access to the devices used. Test runs only check the correctness of device settings, experiment logic, and syntax. If there are no errors in the script, after the test run, the same script is immediately executed in the standard mode with full access to the instruments used.
In order to be able to run a test, one should specify inside a module appropriate values for all the device parameters (since the devices are not accessed) and describe what the function should do during the test run. Typically, it is just different assertions and checkings:
# Stanford Research Systems SR-830 module

# __init__:
self.ampl_min = 0.004     # min amplitude of sine output, V
self.ampl_max = 5         # max amplitude of sine output, V
self.test_amplitude = 0.3 # special test value for the test run

# lock_in_ref_amplitude(): queries or sets the sine-output amplitude.
# Argument: a string with SI unit suffix, e.g. "0.150 mV".
def lock_in_ref_amplitude(self, *amplitude):
    ...
    elif self.test_flag == 'test':
        if len(amplitude) == 1:
            ampl = float(amplitude[0])
            assert self.ampl_min <= ampl <= self.ampl_max, (
                f"Invalid amplitude. Range: {self.ampl_min} to {self.ampl_max}")

        elif len(amplitude) == 0:
            return self.test_amplitude
The test_flag parameter is used to indicate the start of the test and it is usually defined in the initialization method:
# Stanford Research Systems SR-830 module
import sys

def __init__(self):
    ...
    self.test_flag = sys.argv[1] if len(sys.argv) > 1 else 'None'
Unit Testing
The Test Run above is an in-app smoke check: it runs inside Atomize and only verifies that a script's logic and arguments stay within the device limits. For finer-grained, offline checks of a module — its exact command strings and response parsing, with no GUI and no hardware — a module can also be tested with pytest.
Every device communicates with the instrument only through self.device, so a test can replace it with a fake transport that records the commands sent and returns scripted responses:
class FakeVisa:
    def __init__(self, responses=()):
        self.written = []
        self._responses = list(responses)

    def write(self, command):
        self.written.append(command)

    def read(self):
        return self._responses.pop(0)

    def query(self, command):
        self.written.append(command)
        return self._responses.pop(0)
A test then builds the module without opening a real connection (bypassing __init__), injects the fake, and asserts on both the parsed return value and the exact command string:
import atomize.device_modules.Lakeshore_335 as ls

def test_temperature():
    dev = ls.Lakeshore_335.__new__(ls.Lakeshore_335)   # skip __init__/connection
    dev.config = {'interface': 'rs232'}
    dev.status_flag = 1
    dev.test_flag = 'None'                              # exercise the real path
    dev.device = FakeVisa(['298.5'])

    assert dev.tc_temperature('A') == 298.5            # response parsing
    assert dev.device.written == ['KRDG? A']           # command string
Unlike the in-app Test Run, this exercises the real (test_flag != 'test') path — the command building and response parsing that the test mode never reaches. Install the test dependency and run the suite from the Atomize repository root:
Alongside the per-module characterization tests above, the suite includes two broader safety nets: a smoke test that compile-checks every device module and constructs each one in test mode (so a syntax error or a broken test-run branch is caught across the whole device_modules/ directory at once, while modules whose vendor driver isn't installed are skipped), and unit tests for the pure helpers in general_functions (time-string parsing, rounding, SI helpers). A new module is picked up by the smoke test automatically; you only need to add characterization tests for its own command building and response parsing.
Error Messages
It is recommended to write detailed assertion error messages, which can include argument types and argument limits. Below are several examples from various device modules:
# Stanford Research Systems SR-830 module

# argument types; string with SI unit suffix
# self.timeconstant_dict = {'10 us': 0, '30 us': 1, ...}
assert val_key in self.timeconstant_dict, (
    "Incorrect argument; tc: int + [' us', ' ms', ' s', ' ks']")

# argument limits with pyqtgraph helper function
# self.ref_ampl_min = 0.004; self.ref_ampl_max = 5
min_a = pg.siFormat(self.ref_ampl_min, suffix='V', precision=3, allowUnicode=False)
max_a = pg.siFormat(self.ref_ampl_max, suffix='V', precision=3, allowUnicode=False)
assert self.ref_ampl_min <= ampl <= self.ref_ampl_max, (
    f"Incorrect amplitude. The available range is from {min_a} to {max_a}")

# argument types; predefined options
# self.ref_mode_dict = {'Internal': 1, 'External': 0}
assert md in self.ref_mode_dict, (
    f"Incorrect mode; mode: {list(self.ref_mode_dict.keys())}")


# Keysight_3000_Xseries module

# argument types; predefined options
# self.channel_dict = {'CH1': 'CHAN1', 'CH2': 'CHAN2', 'CH3': 'CHAN3', 'CH4': 'CHAN4'}
assert ch in self.channel_dict, (
    f'Invalid channel; channel: {list(self.trigger_channel_dict.keys())}')